Showing posts with label Food. Show all posts

Saturday, June 28, 2025

Fresh Peach Cobbler from Simple Ingredients


Easy Peach Cobbler

Making dessert doesn't have to be hard. Try this recipe and see for yourself.

If you're craving a tasty, fruity dessert to top off your meal, this easy recipe is way better than the frozen fruit cobbler at the grocery store.

Store bought cobbler comes out of the packaging looking like fruit filling with a flat pie crust on top. It's costly and tastes nothing like the cobbler Grandma used to make.

Why not make your own? With a few ingredients out of your cabinet, this dish is ready for the oven. You'll need is the following items:

  • Medium mixing bowl
  • 2 knives
  • Measuring spoons
  • Measuring cup
  • Round oven-proof casserole dish (1 1/2 to 2 quart dish works best)

Use an oven-proof pan like a Pyrex or Corning ware casserole dish (1.5–2 quart) or use a deep dish disposable aluminum pan. No lid is required.


I often find casserole dishes at the thrift store. They're plentiful, not very expensive and make a great gift when making this recipe for a friend. For a couple of dollars, you don't need to worry if your dish disappears after a pot-luck meal or a social gathering.


Ingredients for the Topper:

1 cup all-purpose flour

2 Tbsp granulated sugar

1 1/2 teaspoon baking powder

1/4 teaspoon salt

1/4 cup butter

1 egg, slightly beaten

1/4 cup milk

Ingredients for the Filling:

2 cans of sliced peaches, drained or 4 cups fresh fruit

1 1/2 Tbsp corn starch

1/2 teaspoon cinnamon

1/2 cup brown sugar

1/2 cup liquid (water or drained juice from the canned peaches)

1 Tbsp lemon juice

1 Tbsp butter

  1. Start by making the biscuit topper. In a medium mixing bowl, combine the flour, granulated sugar, baking powder, and salt.
  2. Cut in the butter by using two knives in a Criss cross fashion or use a pastry blender.
  3. Combine the milk and egg and pour over the mixture.
  4. Stir until slightly moistened and set it aside
For the filling:
  1. Drain the canned peaches and save 1/2 cup of the juice. Set the fruit aside.
  2. Add the cornstarch, spice brown sugar and the liquid in a saucepan.
  3. Stir together over medium heat until it thickens.
  4. Add the peaches, lemon juice and butter and cook for another 5 minutes or until the peaches are hot.
  5. Pour the hot fruit mixture into an oven proof casserole dish.
  6. Spoon the biscuit topper over the mixture, making 6 mounds of dough.
  7. Bake at 400 degrees for 20 to 25 minutes until the crust is golden brown.
Serve warm or cold with ice cream and whipped topping (optional.)


Tip: I like a bottom crust so I often use ready-made pie crusts to line the bottom of the pan. Cut them out with a cookie cutter and they make a great crust.

They'll also work for the top crust.


Fresh Blueberry Cobbler:
  1. Use 1 pint of fresh blueberries or drain a 15-ounce can of blueberries reserving 1/2 cup of the syrup for the filling. Set aside.
  2. Blend 2 tablespoons of cornstarch with 1/2 cup of sugar and 1/2 cup of water or use the 1/2 cup of the reserved syrup in a saucepan and cook over medium heat until the mixture thickens and begins to bubble.
  3. Add the drained or fresh blueberries, 1 tablespoon of lemon juice, and 1 tablespoon of butter, and cook until the berries are hot (about 5 minutes).
  4. Pour the hot fruit into a baking dish and cover it with the biscuit topper from the recipe above.
  5. Bake at 400°F for 20 to 25 minutes until golden brown on top.
  6. Serve warm or cold, plain or with ice cream and whipped topping.
Hope you enjoy this family favorite dessert.


Wednesday, April 2, 2025

Regal Princess Cruise to Costa Maya, Roatan, Belize and Cozumel - March 2025

Our favorite activity now that we've retired is cruising. Where we go isn't as important as the journey and the friends we make along the way.

We saved faithfully for years, doing without the luxuries so we could enjoy our golden years. And now, we're reaping the rewards. I only wish we were younger.

Despite our advanced years, we still enjoy listening to live rock and roll bands, dancing, zip lining (oh, yes!), and exploring new and familiar ports. We like collecting T-shirts and a hats from every port we visit.

Our trip this month was probably the best one we've ever had. The ship made it to every port and the hubby finally got to visit Costa Maya which we missed on the last cruise, due to high winds and swells.

Our suite was spacious, warm and inviting. The view from the balcony was fantastic. The service by our steward, Leo, was without a doubt, one of the best experiences. He made sure our cabin was properly stocked, cleaned and even helped when the maintenance folks were out on the deck repairing some pipes. He cleaned up and restored everything to its place.

The food this trip was excellent, from the Lido Deck pizza and burgers to the high-end steakhouse, The Crown Grill. We ate breakfast each morning at Sabatini's where we were treated like honored guests. The evening we enjoyed a specialty meal there, the chef went out of his way to prepare an off-menu item for two of our party - chicken Parmesan, which was in my friend's words, "the best he'd ever had" (other than his wife's, of course.)


This is French Toast with an apple compote and link sausages at Sabatini's Italian Trattoria.

The entertainment in the Piazza kept us hopping to the beat with performances by Everlasting Now and Asian Soul who played all the feel-good songs of the 70s 80s and 90s along with  performances by Cam Dunbar on acoustic guitar and Simon and Olga on violins.

We didn't have time to see all the other performers whose talent was showcased on the ship. We even missed the Theatrical production of Ashlie Amber celebrating Whitney Houston, but we heard she was fabulous.

Our first port, Costa Maya was a hub of activity with four other cruise ships in port. Surprisingly, the tourist center  in the town square wasn't too overcrowded. We were able to visit many of the shops and find some great deals on merchandise.

We didn't take any excursions on this stop. Just walked around in the square, got our passports stamped and then went back onboard.

It was a calm day with tropical temperatures and a refreshing breeze. Still, it was good to get back to the air conditioning and comfortable seating on the ship.
 

Our Effy "family," Star and Nikola went out of their way to make us feel welcome. With their help, I found the perfect gifts for my hubby's upcoming birthday. I was able to trade in a pair of earrings that I'd never worn for a man's necklace and a ring and a bracelet for myself that I absolutely love.

This is the third cruise where we've seen Nikola and he actually remembered us! He's such a nice guy who got us an extraordinary deal on the jewelry.

Effy's founder, Mr. Hermatian's story is a rags-to-riches tale that is truly inspiring. He worked until he no longer could even after his terminal diagnosis. He passed away in 2023 after three decades of designing beautiful jewelry.

Since Effy is based in New York, no taxes have to be paid on purchases. That's a tremendous savings.

At our second port of call, we signed up for a ziplining excursion with Extreme Zip Line Adventures of Roatan. Our friends, Keith and Renee joined us for their first time to try out the experience. After signing waivers and getting fitted with equipment, we had a slightly wait for the truck to take us up the rugged, dirt road straight up the mountains. That was a "hold onto your seat" kind of ride, but once we made it to the first station, the incredible view was well-worth it.

This is us on Station No. 1, 910' feet of up to 20 mph at a maximum of 60 feet above the ground. What a ride! The longest run was about 1610 feet long.

Five stations later, we were back at the Hideaway Bar on Mahogany Bay Beach to rehydrate. Our adrenaline was pumping.

Unfortunately, the professional photographers who usually film videos of the participants were not available for our visit. The guides, Donny and Harold, used our phones to capture a few runs for us. They were exceptionally patient with the four of us who are inexperienced zip liners.

They told us there was no need to rush and they patiently guided us through the whole excursion.


The stairs are steep and strenuous and the heat takes its toll on sedentary septuagenarians like the four of us. But, even when the hubby had to take a quick break to cool down, our guides remained cheerfully understanding. Harold used the wait time to tell us some of the island history and features.

Later that evening, we were invited to a Caribbean Party in the Concierge Lounge onboard with live music by Cam Dunbar and a table full of snacks and mixed drinks at the private function.

Our Suite Experience Concierge, Millie Coulson and newbie Serban Muresan welcomed us warmly and gracefully. We had a fantastic time. In fact, we were partying so loud the musician was told to turn down the volume. Ah, good times!


Sunday, July 16, 2017

Banana Pudding with Homemade Custard

Sometimes I crave something that reminds me of summer and childhood. Years ago, we made this recipe with Nabisco Vanilla Wafers and Instant Banana Pudding.

These days, I prefer the taste of the homemade custard that takes only minutes to cook and the flavor alone makes up for the time invested. It's also easy cleanup as only one medium saucepan is needed.

There are 5 main ingredients needed other than bananas and vanilla wafers. Most of these items I keep on hand in my pantry.

Ingredients for the Custard

  • 1/2 cup granulated sugar - or use 12 packets of Stevia sweetener or Sucralose
  • 4 Tablespoons of powdered corn starch
  • 1/4 cup of Karo corn syrup
  • 2 egg yolks - It's easy to separate the yolks from the whites. See below.
  • 2 cups of whole milk - You can also substitute 2% milk.

After the pudding thickens add:

  • 1 Tablespoon butter
  • 1 Tablespoon vanilla extract or sometimes I use banana extract if I have it.
To prepare the dish you'll need

  • Vanilla wafers and two bananas.
The key to making delicious pudding or custard is in the attention to stirring. Plan to dedicate 15 minutes of your undivided attention to this. Constant stirring eliminates the need for a double boiler and keeps the pudding from scorching and sticking to the pan.

Instructions
Start with a heavy duty medium sized pan.

Measure out the sugar or sweetener right into the cold pan.

Add the corn starch and Karo syrup.


Separate the egg whites from the yolks by using a knife to crack the egg or strike it gently on a the edge of the counter.

Over a separate container, allow the egg white to drip through half of the shell.

Pour the egg yolk into the pan with the dry ingredients.


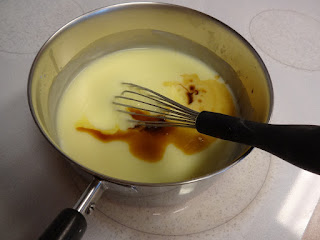
Pour about half a cup of the milk into the ingredients and stir with a whisk to form a paste.

Add the remaining milk and cook over medium heat, stirring constantly.

Set a timer for about 20 minutes. Depending on your stove, it takes from 15 - 20 minutes for the mixture to come to a boil. At the first sign of boiling, remove the pan from the heat and add the pat of butter and vanilla extract. Stir and allow to cool a bit while you prepare the dish.

Line a casserole dish with a layer of Vanilla Wafers. 
Slice the bananas over the wafers.
Pour the cooked pudding custard over the top.
End with another layer of bananas and finish with the custard. Sometimes I crumble a few Vanilla wafers over the top. 

Chill in the refrigerator for at least two hours and serve with whipped cream.

I hope you enjoy this family favorite dessert.

Friday, April 7, 2017

Salad - 50 Ways to Lose Your Blubber

Trying to lose a few pounds at my age has become a real challenge. Two years ago I decided to lose ten pounds. I'm not discouraged. I've only got twenty more pounds to go. "All I had was a salad." Go figure.

This is a favorite with Iceberg lettuce, chopped Roma tomatoes, drained black beans and sliced fresh strawberries. Where I've been going wrong is with the dressing. If you read the label, two tablespoons is an average serving with 140 calories. I usually quadruple that amount. (I may be underestimating a bit.) This week I decided to try something different. I've been using Balsamic Vinaigrette mixed with Zesty Italian Lite dressing and I've lost two pounds.

This was lunch on Monday: Iceberg lettuce, chopped celery, sliced baby carrots, chopped beefsteak tomatoes and dressing. What's missing is the mountain of cheese that I usually shred over the top of this "low-fat" meal. Of course, I've skipped the Simply Dipped Nutty Buddy ice cream cone afterward, too. How droll.
For variety, I tried a salad with rolled up deli turkey, 15 calories per slice, and rather than the entire tomato, I used only half. What a sacrifice!
This one's also a favorite of mine made with baby spinach leaves, deli turkey and half of an avocado. I like to sprinkle a little lemon juice over the top to keep it from browning too quickly. Usually, there's no danger of that since it's gone in 60 seconds. Just kidding. It usually lasts three minutes while I watch an episode of Snapped: Killer Couples or Lt. Joe Kenda on TV.
Here's another way to use up that Costco-size Hillshire's Farm Deli Turkey in the economical five-gallon tub. I back-slid on this one and added shredded cheddar cheese, but to make up for it, there's fresh grapes. So I'm good, right?
Okay, here I'm really falling off the wagon with this tuna salad and its high calorie mayonnaise. Please help me, I'm falling. Down one pound and back up two. Aaaccck!
Getting better all the time with these added black olives, half a boiled egg, Garbanzo beans (for protein) and two rolled up slices of deli ham at 25 calories each. Oh, don't forget the Roma tomatoes and the half cup of Ranch Dressing.
Now, you're cooking. Avocado, black beans, grilled chicken breast, Roma tomatoes over Iceberg lettuce. Yes, now, that's a meal in itself.

But wait, what about the dressing?
Venturing way out on a limb with Artisan type lettuce, otherwise, same stuff, different day. Black beans, Roma tomatoes, boiled egg, hold the salt - I'm on a diet. Ah, never mind. What good is an egg without salt?
This is even better. Tuna with no mayonnaise, sliced baby carrots, baby spinach, Iceberg lettuce, paprika. Uh oh. Giant bowl.
Really branching out now. Adding diced Bell pepper, rolled ham with Swiss cheese, boiled egg, Spinach and Iceberg lettuce. Feeling happy. Have a nice day. Ok. Google won't let me add more images so that's it for now. Eat healthy. Drum roll. Here's Paul Simon, 
50 Ways to Leave Your Lover.

Friday, March 18, 2016

Chocolate Cream Pie Recipe from Aunt Jessie

Once you taste the home made richness of this chocolate cream pie you'll never go back to instant pudding again. It's easy to make and well worth the time it takes.

Holidays were special times when our clan of cousins, aunts, uncles, siblings and parents gathered for a meal as a family. Preparations started before daylight for a full morning of cooking turkeys and baking cakes and pies. 
When it grew close to the lunch hour, we would gather around in the Florida room, lured in by the delicious aromas which wafted into the back yard where we were playing. The festive table was set with platters of every sort of food imaginable from roasted turkey and gravy, mashed potatoes, fresh green beans, salads, cranberry sauce, casserole dishes, and of course, an entire table dedicated to dessert.
There was a variety of cakes and pies including mincemeat pie, pecan and strawberry, but the chocolate cream pie was always my favorite and usually the first one to disappear. Thoughts of those times bring fond memories of those pies made from scratch by someone we love.
It's not hard to duplicate this homemade pie, whether using a store-bought crust or making your own. Cooking the filling takes about twenty-five minutes, during which you can bake the single pie crust and let it cool. Here's how to do it:

Pie Crust Dough Recipe for a One Crust Pie
1 cup sifted all-purpose flour; 1/3 cup of solid vegetable shortening (like Crisco) or butter; 1/4 teaspoon salt and 2-3 tablespoons of cold water.
Sift the flour and salt together into a mixing bowl. Using two knives (in crisscross fashion) or a pastry cutter, cut in the shortening until the mixture looks like cornmeal. Slowly add the cold water, a little at a time, until the dough sticks together in a ball but is not sticky. More water or flour may be needed if the mix is too dry (add drops of water) or too sticky (add a little flour).
If you have time, refrigerate the dough for about an hour. This is usually not needed if the room temp is cool.
Transfer the dough ball to a lightly floured surface and roll it into a circle one inch larger than the pan to allow for a fluted edge. I made a video for Instructions on forming the pie crust:

  1. Place the prepared dough into a deep-dish, 9 inch pie pan.
  2. Trim and fold under the excess edges of the dough as you work your way around the rim.
  3. Shape the edges into scallops by pressing the dough between two fingers and forming an indentation between them with the thumb of the other hand.
  4. Make sure there are no cracks or tears in the uncooked crust. If repair is needed, a drop of water or milk will help mending the cracks.
  5. Since the pie crust must be baked before adding the pudding, use a fork to prick tiny holes all around the edges and bottom of the crust. This allows steam to escape when baking.
  6. Bake the crust at 450 degrees for 10 minutes or until golden brown. Cool completely on a wire rack before filling.


Ingredients and Instructions for the Chocolate Cream Pudding filling:

Ingredients: 2 cups of milk (regular or two percent), 1/4 cup of Corn Syrup, 4 Tablespoons of Corn Starch, 1/2 cup granulated sugar, 2 egg yolks, 4 Tablespoons Hershey's powdered cocoa, 1 Tablespoon butter, 1 teaspoon Vanilla extract. 

Mix together about a half cup of the milk, all the sugar, corn syrup, cornstarch and cocoa in a medium sized, heavy-duty saucepan.

Separate the egg yolks from the egg whites and add the yolks to the mixture and stir thoroughly with a whisk.

Add the rest of the milk and heat the mixture slowly over low to medium heat stirring constantly so it doesn't scorch. It may take between 11 and 15 minutes to reach a boil.

When the mixture comes to a boil and starts to thicken, immediately remove it from the heat and add the butter and vanilla extract stirring until the butter melts.

Let the mixture cool before spooning it into the cooled, baked pie crust.

Refrigerate the pie for at least an hour before serving.


Tips
  • Be sure to watch the milk mixture carefully as it comes up to temperature and stir continuously.
  • Resist the temptation to raise the heat too high. Medium heat is best to avoid scorching the milk and sugar.
  • When the hot mixture starts bubbling up unexpectedly, take the pan off the heat.
  • Allow the pudding to cool completely before pouring it into the crust. This helps keep the crust from getting soggy.
  • If the pastry puffs up in places when baking, use a fork to prick the bubble and release the steam or the crust will bake in the raised shape.
Making homemade whipped cream is quick, easy and delicious. Or, if you like, you can use a prepared topping like Cool Whip or Ready Whip Whipped Cream.

This family recipe is one of my husband's all-time, most requested desserts.

Chocolate Cream Pie

Tuesday, February 16, 2016

Grilling Hot Dogs Outside

Summer is almost here. Time to bring out the barbecue grill and test your skills at outdoor cooking. Never grilled out? Don't worry. It's easier than you think. Even I can do it.

For a number of years, I left the outdoor cooking to the man of the house. It seemed more of a manly thing to do with the dirty charcoal and the use of liquid fire starter. I never imagined how much fun it would be to build a little fire in our Weber grill, skewer my food and actually cook it over an open flame. The first time I took over the tongs was like a brand new world had opened.
One fourth of July, we invited a few of our friends over to celebrate at our place out in the country. For variety, we decided on hamburgers and hot dogs to go with the extra dishes brought in by our guests.

In the sweltering summer heat someone started a horseshoe game and my hubby, the grill Chef, disappeared.
When the flames on the barbecue pit began to signal a fire hazard, it was too late to rescue the little briquettes that were once juicy hamburgers. They were burnt to a crisp and looked like  hockey pucks.

Luckily, we had more hot dogs and managed to feed the multitude. But that day was the turning point on my view of grilling. From that moment forward, I would be the designated grill chef.
One of the first things I learned is something experienced grill chefs know already: You only need a small pile of charcoal for quick cooking.
When I say a small pile, I mean a pile no larger than a quarter of the size of the kettle. For foods that take a long time, you need a lot more charcoal, but not with hamburgers and hot dogs.

First, pour the charcoal into one area of the lower grill inside the drum. It's important that the old ashes are discarded safely in a fireproof bucket or a trash bag before you begin. 

Never dump out the grill ashes until you're certain that they are cold.
Squirt on a small amount of liquid charcoal lighter.

Use an electric starter or a long wooden match to ignite the pile of charcoal and wait for the edges to turn white.

When the coals start to burn off the charred remains of the last cookout I use my wire brush to vigorously clean the top grill to remove any rust and debris.

Safety Reminders - Keep some water handy to put out smoldering ashes that fly out of the grill and land in the grass. I keep a squirt bottle handy to extinguish any flare ups.
Don't grill out if there is a strong wind. 
Don't overuse the charcoal starter fluid or the chemical taste will transfer to the food along with the chemicals it contains. 
Keep food refrigerated until the last possible moment when it goes on the grill. Promptly refrigerate any cooked food that is left over, especially in the heat of the summer.

Another key is to keep things moving around on the grill. Turn the hot dogs frequently and move them to a cool area when they start cooking too fast or turn too black.


The key to successful grilling is to be prepared for any flame ups from dripping grease. Since the hot dogs are fully cooked to begin with, the timing and amount of grilling is really up to your personal preferences. If you've never grilled out before, don't worry. It's so easy even I can do it, seriously.

The Weber Original 22 inch grill has served us for nearly two decades. 

We've replaced the top grill once due to rust, and with a good cleaning, it's nearly the same as when we got it from Home Depot.
With the barbecue tongs in hand, I rule my smoky domain. All the best in your outdoor cooking. Happy grilling!